Before embarking on the delightful journey of making sushi at home, let’s talk pairings. Sushi is incredibly versatile and can be complemented by a variety of side dishes and drinks. Here are some fantastic options:
1. Miso Soup: A warm bowl of miso soup adds warmth and flavor balance to your sushi meal. The umami notes of the miso perfectly contrast the freshness of the sushi.
2. Edamame: These lightly salted soybeans are a crunchy and nutritious side that can be served hot or cold. They are an easy appetizer and perfect for nibbling while making sushi.
3. Green Tea: Unsweetened green tea, particularly matcha or sencha, offers a refreshing cleanse to the palate. It complements the rice and seafood beautifully.

I remember the first time I made sushi at home. It felt like I was embarking on a culinary adventure, right in my very own kitchen. The thrill of rolling fish and rice while learning to master this ancient art form was exhilarating. As a food enthusiast and seasoned cook, I couldn’t wait to share this experience with everyone. Sushi isn’t just food; it’s an experience, a blend of texture, taste, and creativity. Making sushi at home is easier than you might think, and it gives you the control to customize your rolls to your liking. So grab your ingredients, and let’s roll!
Why Does This Recipe Work?
In crafting this homemade sushi recipe, I stumbled upon a few key reasons why it truly shines. Here are some compelling points:
1. Freshness is Key: You choose the ingredients. Using the freshest fish and vegetables elevates the entire dish. Fish sourced from a local market ensures that you’re getting the best quality.
2. Customization: Roll your sushi exactly how you like. Whether you are into traditional salmon nigiri or love the crunch of crispy tempura, the options are limitless.
3. Technique Simplified: This recipe breaks down the sushi-making process into easy-to-follow steps. You don’t need to be a pro to get it right the first time.
4. Health Benefits: Sushi can be a healthy meal choice. When you prepare it yourself, you can control the seasoning, oil, and fish quality. It’s a delicious way to pack in nutrients from fish, vegetables, and even healthy fats from avocado.
You will also like the following Appetizer recipes!
How Does It Taste?
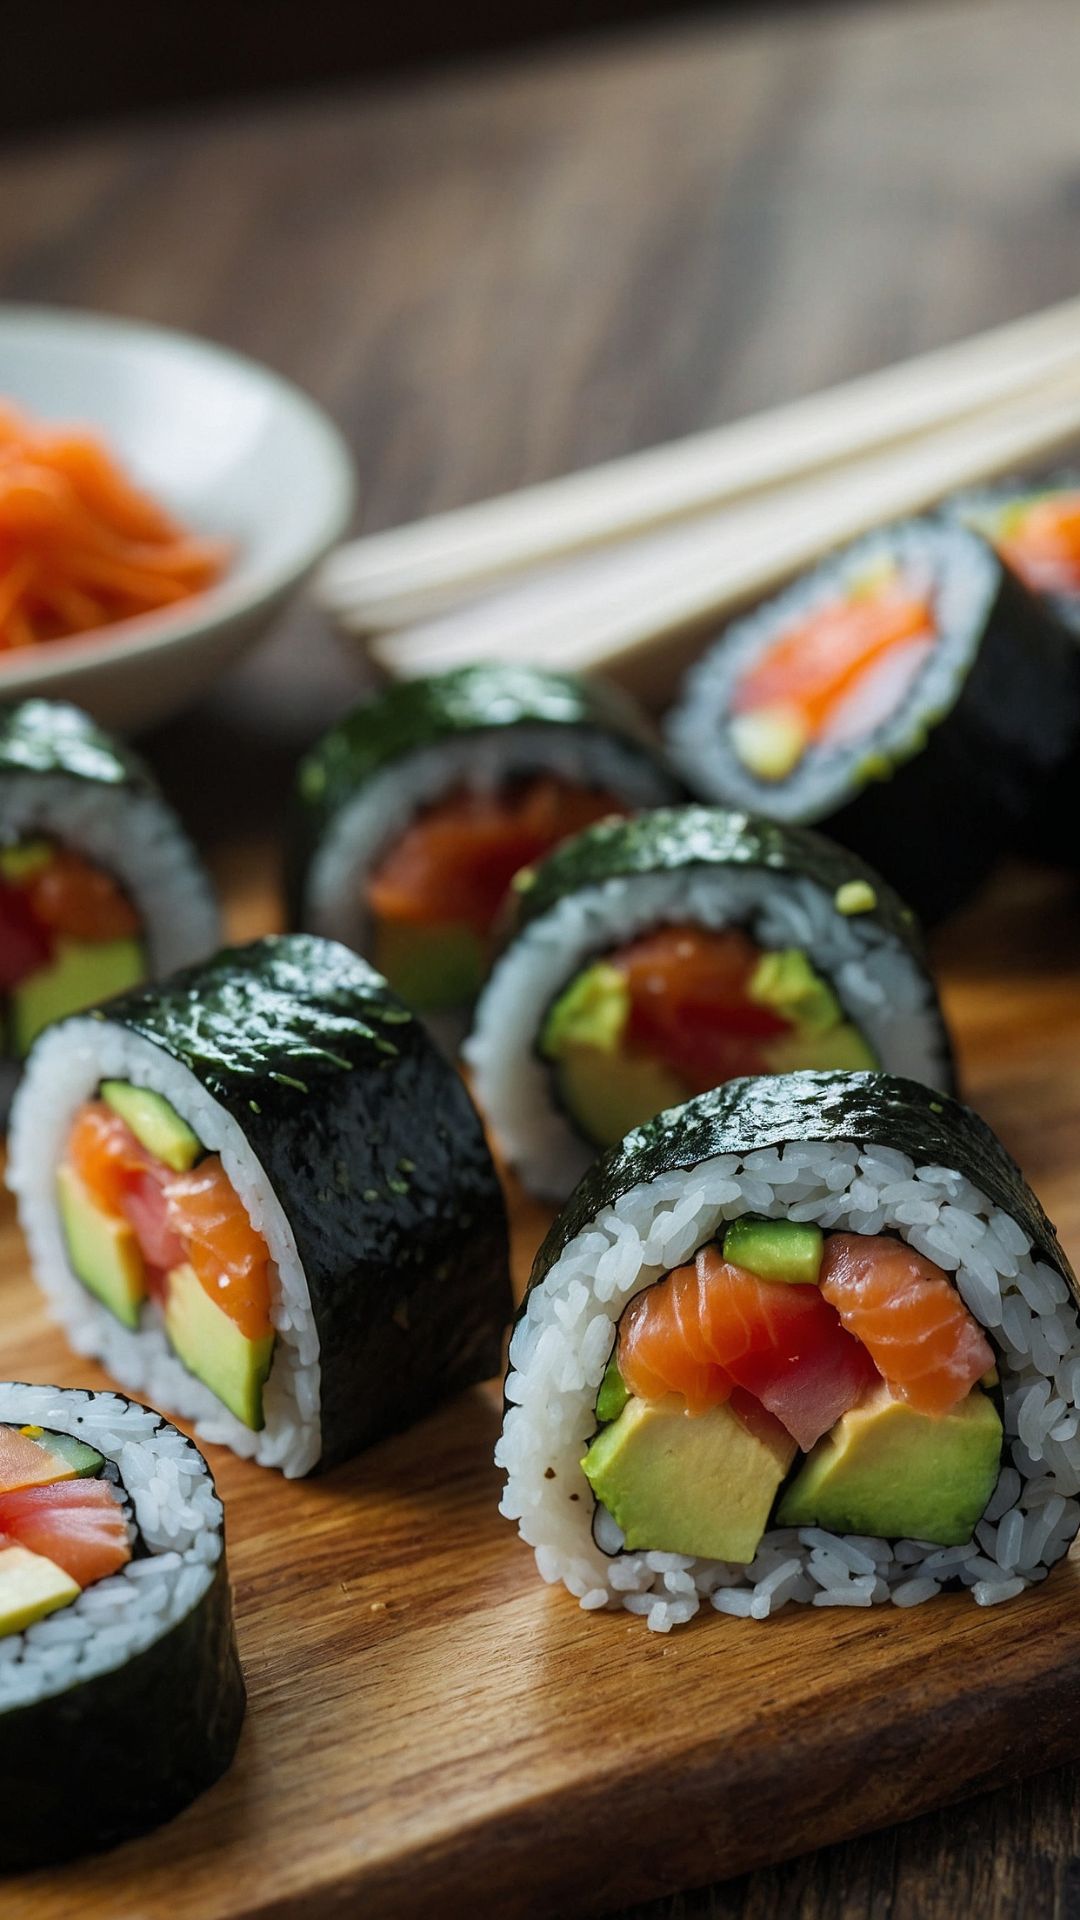
Imagine biting into a roll of sushi made in your own kitchen. The flavors meld together in a harmonious bite. The sushi rice is slightly sticky and has that perfect balance of sweet and salty. The seaweed, or nori, wraps around the rice, giving a bit of a crunch as you press into it.
The fresh salmon melts in your mouth, while the creamy avocado adds a rich texture. And then there’s the pop of flavor from the pickled ginger, which cleanses your palate, leaving you eager for another bite. It’s an orchestra of flavors with every roll.
What Sets This Recipe Apart?
Many sushi recipes online offer the same basic idea. However, this one stands apart due to its accessibility. The method is simplified; you will not need any special equipment or training. It encourages creativity while providing a foundation. You will learn the core techniques of sushi making while creating something uniquely yours.
The Ingredients
Here’s what you’ll need to bring this sushi dream to life:
- 1 ripe avocado, thinly sliced
- 1 teaspoon toasted sesame seeds (optional, for nutty crunch)
- 1 batch seasoned sushi rice (prepared with rice vinegar, sugar, and salt)
- 4 oz cream cheese, cut into thin strips
- Tamari or low-sodium soy sauce, for dipping
- 1 tablespoon pickled ginger, finely chopped
- ½ lb sashimi-grade salmon (or your preferred raw fish)
- 6 sheets roasted sushi nori (seaweed paper)

Instructions
Making sushi is an engaging and satisfying process. Here’s how to do it step-by-step:
Step 1: Prepare the Sushi Rice
Start by rinsing the sushi rice in cold water. You’ll want to wash until the water runs clear to remove excess starch. Next, cook the rice according to package instructions. After it’s cooked, stir in a mixture of rice vinegar, sugar, and salt. Let it cool to room temperature.
Step 2: Gather Your Ingredients
Place all your ingredients within arm’s reach. Having everything prepped will make the assembly process smooth and enjoyable.
Step 3: Set Up Your Rolling Station
Lay a bamboo sushi rolling mat on a clean, flat surface. Place a sheet of nori shiny side down on the mat.
Step 4: Spread the Rice
Using wet hands (to prevent sticking), take a handful of sushi rice and spread it evenly over the nori, leaving about an inch at the top edge. Press gently but firmly.
Step 5: Add Fillings
On top of the rice, arrange your fillings: slices of salmon, avocado, and cream cheese. You can go as heavy or light with the fillings as you prefer.
Step 6: Roll It Up
Using the bamboo mat, start to roll the sushi away from you, tucking the filling in as you go. Roll tightly but don’t squish the ingredients. Once you reach the edge of the nori, moisten it slightly to seal the roll.
Step 7: Slice and Serve
Using a sharp knife, slice the sushi into bite-sized pieces. Wipe the knife with a wet cloth between cuts for clean edges. Arrange the pieces on a plate and serve with soy sauce and pickled ginger. Enjoy!
Notes
Here are some tips to ensure your sushi-making experience is a hit:
– Use Short-Grain Rice: Sushi rice is sticky, which helps the pieces hold together well. Don’t substitute it with long-grain rice.
– Fresh Ingredients: Always use sashimi-grade fish to ensure safety and quality.
– Wet Your Hands: When handling rice, always wet your hands. This prevents the rice from sticking to your fingers.
– Customize Fillings: Feel free to swap out fillings based on taste or dietary preferences. Try cooked shrimp or vegetables for a vegetarian option.
– Practice Makes Perfect: Rolling sushi takes time to master. Don’t get discouraged by the first few attempts—they’ll get better with practice.
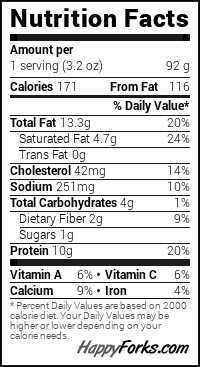
Nutrition Information
Sushi can be a nutritious meal option! Here’s a breakdown of the typical nutritional profile for one sushi roll containing fish and avocado:
How Do You Store This Sushi?
If you have leftover sushi, store it in an airtight container in the refrigerator. It’s best consumed within 24 hours. The rice may harden, and the nori could lose its crispness, so keep these factors in mind before deciding to save leftovers.

Sides for Sushi
Enhance your sushi experience with some delightful side dishes:
1. Seaweed Salad: This crunchy and tangy salad provides a refreshing contrast to the sushi. Made from rehydrated seaweed, sesame oil, and vinegar, it complements well.
2. Tempura Vegetables: A light batter and fried veggies add a warm and crunchy side. Think of sweet potatoes, zucchini, or bell peppers for a delicious companion to your sushi.
3. Cucumber Salad: Thinly sliced cucumbers tossed with rice vinegar, sesame oil, and a pinch of sugar create a light and refreshing palate cleanser.
What Alternatives Can You Use for the Ingredients?
Not everything will always be available in your kitchen. Here are some alternatives:
– Brown Rice: If you’re looking for a healthier option, consider using brown rice instead of traditional sushi rice. Just adjust cooking times.
– Cream Cheese Options: If lactose is a concern, swap out cream cheese for silken tofu or avocado for creaminess.
– Fish Alternatives: For those avoiding raw fish, cooked shrimp, crab, or even grilled chicken can serve as excellent alternatives.
– Nori Substitutes: If nori isn’t available, you can use rice paper wrappers. While the texture is slightly different, they can still wrap up sushi fillings nicely.
Equipment
- Bamboo mat
- mixing box
Ingredients
- 1 ripe avocado
- 1 teaspoon toasted sesame seeds
- 1 batch seasoned sushi rice
- 4 oz cream cheese
- Tamari or low-sodium soy sauce
- 1 tablespoon pickled ginger
- ½ lb sashimi-grade salmon
- 6 sheets roasted sushi nori
Instructions
Step 1: Prepare the Sushi Rice
- Start by rinsing the sushi rice in cold water. You’ll want to wash until the water runs clear to remove excess starch. Next, cook the rice according to package instructions. After it’s cooked, stir in a mixture of rice vinegar, sugar, and salt. Let it cool to room temperature.
Step 2: Gather Your Ingredients
- Place all your ingredients within arm’s reach. Having everything prepped will make the assembly process smooth and enjoyable.
Step 3: Set Up Your Rolling Station
- Lay a bamboo sushi rolling mat on a clean, flat surface. Place a sheet of nori shiny side down on the mat.
Step 4: Spread the Rice
- Using wet hands (to prevent sticking), take a handful of sushi rice and spread it evenly over the nori, leaving about an inch at the top edge. Press gently but firmly.
Step 5: Add Fillings
- On top of the rice, arrange your fillings: slices of salmon, avocado, and cream cheese. You can go as heavy or light with the fillings as you prefer.
Step 6: Roll It Up
- Using the bamboo mat, start to roll the sushi away from you, tucking the filling in as you go. Roll tightly but don’t squish the ingredients. Once you reach the edge of the nori, moisten it slightly to seal the roll.
Step 7: Slice and Serve
- Using a sharp knife, slice the sushi into bite-sized pieces. Wipe the knife with a wet cloth between cuts for clean edges. Arrange the pieces on a plate and serve with soy sauce and pickled ginger. Enjoy!
Notes
- Use Short-Grain Rice: Sushi rice is sticky, which helps the pieces hold together well. Don’t substitute it with long-grain rice.
- Fresh Ingredients: Always use sashimi-grade fish to ensure safety and quality.
- Wet Your Hands: When handling rice, always wet your hands. This prevents the rice from sticking to your fingers.
- Customize Fillings: Feel free to swap out fillings based on taste or dietary preferences. Try cooked shrimp or vegetables for a vegetarian option.
- Practice Makes Perfect: Rolling sushi takes time to master. Don’t get discouraged by the first few attempts—they’ll get better with practice.
Nutrition
Frequently Asked Questions
1. Can I use regular rice for sushi?
Regular rice doesn’t have the same sticky quality as sushi rice. It’s best to use a short-grain variety specifically labeled for sushi.
2. How do I know if fish is sushi-grade?
Sushi-grade fish is typically flash-frozen to eliminate parasites. Purchase from a trusted fishmonger and ask about the source to ensure freshness.
3. Is making sushi at home cost-effective?
Yes! Making sushi at home allows you to control ingredient costs and portion sizes. You can save a lot compared to dining out.
4. Can sushi be vegan?
Absolutely! You can make sushi with a variety of vegetables, tofu, or vegan proteins. Popular fillings include avocado, cucumber, carrots, and even mango.
Conclusion
Making sushi at home is not just about food; it’s about creativity, flavors, and making something special. The experience can be fun and rewarding. Take your time, explore different flavors, and most importantly, enjoy the process.
Get those ingredients together, gather your loved ones, and start rolling. You’ll find that sushi isn’t just raw fish wrapped in rice—it’s a journey, and every piece tells a story. Happy sushi-making!