Winter can be a magical time, especially when the snow begins to fall, blanketing everything in white. There’s a certain joy that comes from stepping outside and watching those delicate snowflakes drift down from the sky. It’s nature’s confetti! But for me, the real fun begins after the snow settles. One of the most delightful joys of winter is making snow ice cream. This recipe turns snowy days into sweet memories, and trust me, it’s a treat you won’t want to miss.

Pairing Suggestions
Before diving into the intricacies of snow ice cream, let’s talk about some fun pairings. Snow ice cream is versatile; it can be enjoyed on its own or complemented with some delightful treats. Here are some ideas:
Warm Chocolate Sauce: Drizzle this over your snow ice cream for a hot-cold sensation.
Fresh Fruit: Sliced strawberries or bananas add a fresh twist.
Crunchy Nuts: Chopped almonds or walnuts can provide a nice contrast in texture.
Whipped Cream: A dollop of this fluffy topping takes the treat to another level.
With these pairings, your snow ice cream can transform into a dessert extravaganza!
You will also like the following Dessert recipes!
What is Snow Ice Cream?
Snow ice cream is a delightful, no-cook dessert made from freshly fallen snow, combined with simple pantry staples. The origins of this treat go way back. It’s a favorite in many snowy regions, often passed down through generations as a fun winter activity for families. Imagine a simple recipe that captures the essence of a snowy day, bringing joy to both young and old.
Why This Recipe Works
Simplicity: The recipe requires few ingredients. If it’s snowing, you likely already have what you need at home. No last-minute trips to the store.
Customizable: You can modify the flavors to suit your palate. Want chocolate? Add cocoa powder. Prefer fruity? Use flavored extracts. The sky’s the limit!
Nostalgia: Making snow ice cream often sparks fond childhood memories of winter fun. Sharing this activity can create new memories with your loved ones.
Quick and Fun: When it’s snowing outside, the last thing you want is a lengthy cooking session. Snow ice cream comes together in a matter of minutes.
Ingredients You’ll Need for Snow Ice Cream
Creating the perfect snow ice cream is simple! Here’s what you’ll need:
8 cups freshly fallen clean snow or fluffy shaved ice (adjust if you’re looking for a thicker or thinner texture).
1/3 cup fine white sugar or cane sugar.
1 tablespoon sweetened condensed milk (optional, but it adds a richness and creaminess).
1 teaspoon pure vanilla extract for that classic creamy flavor.
1/4 teaspoon almond extract (optional, and gives an interesting nutty note).
A pinch of fine sea salt or Himalayan pink salt enhances the sweetness.
Optional toppings: Colorful sprinkles, mini chocolate chips, or shredded coconut can make your creation even more exciting.

How to Make Snow Ice Cream
Let’s turn that snow into a delightful dessert with these straightforward steps.
Step 1: Gather Your Snow
Make sure you’re collecting fluffy, clean snow. Avoid yellow snow—just trust me on this one! Grab a large bowl or a container and pack about eight cups of snow. Aim for freshly fallen snow; it’s the fluffiest and will give you the best texture.
Step 2: Prepare the Mixing Bowl
In a separate bowl, combine the sugar, sweetened condensed milk (if using), and vanilla extract. Stir everything to create a smooth mixture. If you’re feeling adventurous, add the almond extract for a twist.
Step 3: Combine with Snow
Now, pour this mixture over your bowl of snow. Use a spatula or wooden spoon to gently fold the mixture into the snow. Be careful not to overmix; you want to maintain some of that fluffy texture.
Step 4: Taste and Adjust
Here’s where you can show off your creativity. Taste your snow ice cream and adjust the flavor. If it’s too sweet, you can add a bit of snow. Want more depth? A dash more vanilla or almond extract can do wonders.
Step 5: Serve
Scoop the snow ice cream into bowls and add your favorite toppings. Sprinkles, mini chocolate chips, or shredded coconut can turn this simple treat into a fantastic dessert that will impress everyone.
Tips for Making Perfect Snow Ice Cream
Choose the Right Snow: Fresh, cold, fluffy snow is the best. Pack it down lightly to ensure a proper texture.
Adjust Consistency: If the mixture is too runny, add more snow. If it’s too thick, incorporate a bit of milk or cream to loosen it up.
Flavor Variations: Experiment with flavors like peppermint or chocolate by using flavored extracts or cocoa powder.
Work Quickly: Snow melts, so it’s best to assemble your ice cream quickly for the best texture.
Keep It Cold: If you make a large batch, place it in the freezer briefly to keep it from melting while you serve.
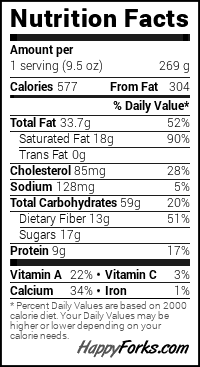
Nutrition Information
While snow ice cream is primarily a fun treat, it’s decent, too! Here’s an overall nutrition breakdown per serving (about 1 cup):
How to Store Leftovers
If you end up with any leftovers (that’s a rare occurrence!), store the snow ice cream in an airtight container in the freezer. You can keep it for up to a week, but keep in mind, the texture may change as it freezes longer.
Recommended Side Dishes for Snow Ice Cream
Making snow ice cream is fun and all, but consider these complementary treats to serve alongside:
Chocolate Chip Cookies: Fresh-baked cookies add a delightful crunch.
Puff Pastry Twists: Savory or sweet, they pair beautifully with the cold ice cream.
Fruit Salad: A fresh fruit mix can balance the sweetness and add a refreshing touch.
Hot Cocoa: A steamy cup of hot cocoa complements the cold treat well, creating a perfect contrast.

Substitute Options for Ingredients
If you find yourself missing an ingredient, don’t fret! Here are some substitutes:
Sugar: Honey or maple syrup can be used instead. Just remember they are sweeter, so adjust appropriately.
Milk: Almond milk, oat milk, or other dairy-free alternatives work well and still provide creaminess.
Vanilla Extract: If you don’t have vanilla on hand, try using a touch of rum or bourbon for an adult twist.
Almond Extract: A few drops of coconut extract can provide a tropical spin to your snow ice cream.

Equipment
- A large bowl
- whisk
Ingredients
- 8 cups freshly fallen clean snow or fluffy shaved ice
- 1/3 cup fine white sugar or cane sugar.
- 1 tablespoon sweetened condensed milk
- 1 teaspoon pure vanilla extract
- 1/4 teaspoon almond extract
- A pinch of fine sea salt or Himalayan pink salt
Optional toppings:
- Colorful sprinkles mini chocolate chips, or shredded coconut can make your creation even more exciting.
Instructions
Step 1: Gather Your Snow
- Make sure you’re collecting fluffy, clean snow. Avoid yellow snow—just trust me on this one! Grab a large bowl or a container and pack about eight cups of snow. Aim for freshly fallen snow; it’s the fluffiest and will give you the best texture.
Step 2: Prepare the Mixing Bowl
- In a separate bowl, combine the sugar, sweetened condensed milk (if using), and vanilla extract. Stir everything to create a smooth mixture. If you’re feeling adventurous, add the almond extract for a twist.
Step 3: Combine with Snow
- Now, pour this mixture over your bowl of snow. Use a spatula or wooden spoon to gently fold the mixture into the snow. Be careful not to overmix; you want to maintain some of that fluffy texture.
Step 4: Taste and Adjust
- Here’s where you can show off your creativity. Taste your snow ice cream and adjust the flavor. If it’s too sweet, you can add a bit of snow. Want more depth? A dash more vanilla or almond extract can do wonders.
Step 5: Serve
- Scoop the snow ice cream into bowls and add your favorite toppings. Sprinkles, mini chocolate chips, or shredded coconut can turn this simple treat into a fantastic dessert that will impress everyone.
Notes
- Choose the Right Snow: Fresh, cold, fluffy snow is the best. Pack it down lightly to ensure a proper texture.
- Adjust Consistency: If the mixture is too runny, add more snow. If it’s too thick, incorporate a bit of milk or cream to loosen it up.
- Flavor Variations: Experiment with flavors like peppermint or chocolate by using flavored extracts or cocoa powder.
- Work Quickly: Snow melts, so it’s best to assemble your ice cream quickly for the best texture.
- Keep It Cold: If you make a large batch, place it in the freezer briefly to keep it from melting while you serve.
Nutrition
Frequently Asked Questions
Can I use old snow to make ice cream?
Using older snow can be risky. It’s best to gather snow that’s fresh and clean to avoid any contaminants.
What if I can’t find any snow?
If Mother Nature isn’t cooperating, you can use crushed ice instead. Blend ice with a bit of milk and sugar for a similar texture.
How much snow do I need?
Aim for about eight cups of snow for a substantial batch. You can always adjust based on the number of servings you need.
Is this recipe suitable for kids?
Absolutely! Snow ice cream is a fun activity for kids and can be made in flavors they’ll love. Just supervise the gathering of snow.
Can I make snow ice cream vegan?
Yes! Use non-dairy milk and ensure your sugar is vegan-friendly. You can easily enjoy this treat without animal products.
Conclusion
Snow ice cream is more than just a dessert; it’s a delightful way to embrace winter and create cherished memories. This nostalgic treat allows creativity to flourish in the kitchen. Gather your loved ones, don your mittens, and make some sweet memories together.
Don’t forget those fun toppings! Snow ice cream is just a few bowls away, so enjoy the magic of winter while it lasts. Embrace the season and indulge in a treat that’s as cool as the snowflakes that inspired it. After all, what could be better than a chilly bowl of homemade goodness on a frosty day? Enjoy!